Hi, Just checking in.
I haven't posted something in a while.
I am still here :)
David Gleba
Thursday, July 19, 2018
Monday, February 13, 2017
Layered Process Audit Application
I want to make a quality audit application - Layered process audit - think survey app.
Along these lines:
https://github.com/williej/rails-nested-survey
This one is quite simple and uses cocoon nested forms.
I want to add question types (like harley/surveyor), drop down list of questions to choose from, sort order for questions, answers should have and issues field and corrections field.
Questions could have correct answers.
https://github.com/harley/surveyor
- This is close to what I want. BUT.. I don't understand the code he uses. I more understand cocoon nested forms like williej uses.
- Proposed changes..
- I want to add drop-down question type, drop down list of questions to choose from, sort order for questions,
- answers should have and issues field and corrections field.
- Questions could have correct answers.
This is what I have built so far..
https://github.com/dgleba/lpa338
Notes:
- I want to use devise with devise-ldap-authenticable, to use our active directory for user/pass like I am using on other apps.
Other examples..
https://github.com/runtimerevolution/survey ( has online demo )
https://github.com/code-mancers/rapidfire ( has online demo, see demo app code and link there )
Sign in. Pick an audit. 7-20 questions are presented based on who you are. Answer the questions and provide comments regarding issues and corrective actions taken.
I have written many apps, but I can't get my head around this one.
_____________
As I think about this more, I have hacked on the williej schema by taking inspriation from harley/surveyor.
These are the scaffolds to create it.
----
rails generate scaffold Answer body:text choice:references question:references response:references issue:string action:text -f
rails generate scaffold Choice name:string question:references -f
rails generate scaffold Question name question_list:references sort:integer qtype:integer survey:references -f
rails generate scaffold QuestionList name:string sort:integer active_status:integer -f
rails generate scaffold Survey name:string -f
rails generate scaffold Response survey:references user:references ip:string -f
----
Previously, I had hacked on this...
See > symbols below..
ActiveRecord::Schema.define(version: 20160728042324) do
create_table "answers", force: :cascade do |t|
t.integer "choice_id"
t.integer "question_id"
t.integer "response_id"
t.string "content"
> text issue
> text correction
t.datetime "created_at", null: false
t.datetime "updated_at", null: false
t.index ["choice_id"], name: "index_answers_on_choice_id"
t.index ["question_id"], name: "index_answers_on_question_id"
t.index ["response_id"], name: "index_answers_on_response_id"
end
create_table "choices", force: :cascade do |t|
t.integer "question_id"
t.string "content"
t.datetime "created_at", null: false
t.datetime "updated_at", null: false
t.index ["question_id"], name: "index_choices_on_question_id"
end
create_table "collaborations", force: :cascade do |t|
t.integer "survey_id"
t.integer "user_id"
t.integer "role"
t.datetime "created_at", null: false
t.datetime "updated_at", null: false
t.index ["survey_id"], name: "index_collaborations_on_survey_id"
t.index ["user_id"], name: "index_collaborations_on_user_id"
end
create_table "questions", force: :cascade do |t|
t.string "title"
t.integer "survey_id"
t.integer "type"
> integer sort
> integer active
t.datetime "created_at", null: false
t.datetime "updated_at", null: false
t.index ["survey_id"], name: "index_questions_on_survey_id"
end
create_table "responses", force: :cascade do |t|
t.integer "survey_id"
t.string "ip"
t.datetime "created_at", null: false
t.datetime "updated_at", null: false
t.index ["survey_id"], name: "index_responses_on_survey_id"
end
create_table "surveys", force: :cascade do |t|
t.string "title"
t.datetime "created_at", null: false
t.datetime "updated_at", null: false
end
create_table "users", force: :cascade do |t|
t.string "email"
t.string "password_digest"
t.datetime "created_at", null: false
t.datetime "updated_at", null: false
t.boolean "admin", default: false
end
end
Thursday, February 9, 2017
Test to get data from PLC to influxDB
Installing Ignition Server
Conditions:
- ubuntu 14.04 server with LXDE running in virtualbox VM
https://inductiveautomation.com/downloads/ignition
install:
If Java 8 is not already installed, run the following commands to install it:
sudo add-apt-repository ppa:webupd8team/javasudo apt-get updatesudo apt-get install oracle-java8-installer
- Ignition-7.9.1-linux-x64-installer.run
https://docs.inductiveautomation.com:8443/display/DOC/Installing+Ignition+on+Linux
start the gateway
- sudo /etc/init.d/ignition start
Error:
albe@v206c:~/Downloads$ sudo /etc/init.d/ignition start
Starting Ignition Gateway...
Waiting for Ignition Gateway......................
WARNING: Ignition Gateway may have failed to start.
_____________
https://www.influxdata.com/
wget https://dl.influxdata.com/influxdb/releases/influxdb_1.2.0_amd64.deb
sudo dpkg -i influxdb_1.2.0_amd64.deb
Installed OK.
_____________
https://github.com/coussej/node-opcua-logger
_____________
http://www.osboxes.org/ubuntu-mate/
Ubuntu Mate 16.04 Xenial
VirtualBox
VirtualBox (VDI) 64bit Download Size: 1.1GB
MD5: 7f0eb37bfa12d3e7570e2175f4141dc0
Username: osboxes
Password: osboxes.org
VB Guest Additions & VMware Tools: Not Installed
_____________
https://rodandfly.ca/ignition-with-simulated-plc-to-influxdb-with-via-opc-ua/
_____________
Friday, February 3, 2017
Multivariate Analysis - Collecting the Data
Open source Industrial data collection with OPC server:
Or maybe not..
Updated: 2017-02-13 11:49 AM
1.
http://coussej.github.io/2016/04/18/Building-An-Open-Source-Process-Historian/
I’m currently testing this on a production system for monitoring some values in a Siemens S7 PLC, using a Simatic NET v12 server.
2.
OPC to InfluxDB plugin
https://github.com/coussej/node-opcua-logger
3.
I think this is OPC server..
https://en.wikipedia.org/wiki/OPC_Unified_Architecture
https://en.wikipedia.org/wiki/Open_Platform_Communications
4.
Python OPC UA communication to Allen Bradley Modbus
https://github.com/FreeOpcUa/python-opcua/issues/116
https://github.com/zerox1212/python-opcua-modbus-driver
5.
Links:
http://industrial.softing.com/en/news/news-details/article/opc-ua-gateway-for-siemens-s7-plc-connection.html
6.
OPC UA made easy
https://github.com/uaf/uaf
7.
Ignition:
2017-02-06:
We are looking at the Ignition server product.
Example: SQL bridge module, Allen-Bradley Driver Suite, Siemens Driver Suite. This should get the data from PLC to OPC UA server.
https://inductiveautomation.com/
https://inductiveautomation.com/pricing/ignition
11.
OPC - UA -- Chris has done some testing.
2017-02-13
https://rodandfly.ca/ignition-with-simulated-plc-to-influxdb-with-via-opc-ua/
15.
How to connect to ignition opc-ua anonymous
https://support.inductiveautomation.com/usermanuals/ignition/index.html?connecting_to_opc_ua.htm
https://support.inductiveautomation.com/usermanuals/ignition/index.html?troubleshooting_opc_com_connec.htm
http://www.opcconnect.com/uafree.php
41.
MVA:
ProSensus Inc.: Overview | LinkedIn
Sold to Aspen Technologies
https://en.wikipedia.org/wiki/Multivariate_analysis
Notes:
IOT - protocol is MQTT
plc reading ref...
https://www.raspberrypi.org/forums/viewtopic.php?f=37&t=81551
Most of the PLCs support the Modbus protocol (TCP or RTU).
https://www.raspberrypi.org/forums/viewtopic.php?f=37&t=81551
http://stackoverflow.com/questions/39006884/pymodbus-failed-to-connect-with-plc-slave-and-raspberry-pi-master
Or maybe not..
Updated: 2017-02-13 11:49 AM
1.
http://coussej.github.io/2016/04/18/Building-An-Open-Source-Process-Historian/
I’m currently testing this on a production system for monitoring some values in a Siemens S7 PLC, using a Simatic NET v12 server.
2.
OPC to InfluxDB plugin
https://github.com/coussej/node-opcua-logger
3.
I think this is OPC server..
https://en.wikipedia.org/wiki/OPC_Unified_Architecture
https://en.wikipedia.org/wiki/Open_Platform_Communications
4.
Python OPC UA communication to Allen Bradley Modbus
https://github.com/FreeOpcUa/python-opcua/issues/116
https://github.com/zerox1212/python-opcua-modbus-driver
5.
Links:
http://industrial.softing.com/en/news/news-details/article/opc-ua-gateway-for-siemens-s7-plc-connection.html
6.
OPC UA made easy
https://github.com/uaf/uaf
7.
Ignition:
2017-02-06:
We are looking at the Ignition server product.
Example: SQL bridge module, Allen-Bradley Driver Suite, Siemens Driver Suite. This should get the data from PLC to OPC UA server.
https://inductiveautomation.com/
https://inductiveautomation.com/pricing/ignition
- Scroll to the bottom and see the individual item prices.
11.
OPC - UA -- Chris has done some testing.
2017-02-13
https://rodandfly.ca/ignition-with-simulated-plc-to-influxdb-with-via-opc-ua/
15.
How to connect to ignition opc-ua anonymous
https://support.inductiveautomation.com/usermanuals/ignition/index.html?connecting_to_opc_ua.htm
- see - Message Security Mode
- see - Authentication
https://support.inductiveautomation.com/usermanuals/ignition/index.html?troubleshooting_opc_com_connec.htm
- see - Allow Anonymous Access
http://www.opcconnect.com/uafree.php
41.
MVA:
ProSensus Inc.: Overview | LinkedIn
Sold to Aspen Technologies
https://en.wikipedia.org/wiki/Multivariate_analysis
Notes:
IOT - protocol is MQTT
plc reading ref...
https://www.raspberrypi.org/forums/viewtopic.php?f=37&t=81551
Most of the PLCs support the Modbus protocol (TCP or RTU).
https://www.raspberrypi.org/forums/viewtopic.php?f=37&t=81551
http://stackoverflow.com/questions/39006884/pymodbus-failed-to-connect-with-plc-slave-and-raspberry-pi-master
Wednesday, January 25, 2017
How to run a Windows RemoteApp on an Ubuntu Client PC
2017-01-25 David Gleba
I used:
Windows 7 ultimate for 'server'
Linux Mint 18 XFCE for 'client' (Based on Ubuntu 16.04)
I am also working with my standard server (as 'client'): see github/dgleba - vamp206a
Ref:
My notes..
https://docs.google.com/document/d/1LwGE6nvIaAgQRHvp07JcLUb5Erc50e40poFw94SLglI/edit?usp=sharing
1. Setup Remote access on Windows machine that will act as the 'server'Windows 7 ultimate for 'server'
Linux Mint 18 XFCE for 'client' (Based on Ubuntu 16.04)
I am also working with my standard server (as 'client'): see github/dgleba - vamp206a
Ref:
My notes..
https://docs.google.com/document/d/1LwGE6nvIaAgQRHvp07JcLUb5Erc50e40poFw94SLglI/edit?usp=sharing
Steps to do in Windows (screen shots are from Windows 7)
Create a User account for yourself in Windows
- Click on Start
- Right-Click on Computer
- Select & click on Properties
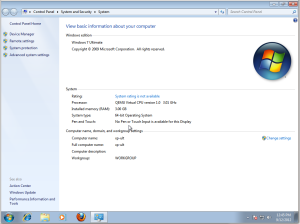
After clicking on Properties you will see the following menu on which you need to select/click-on “Remote settings” in the upper-left.
On the next screen that is presented click on the Tab labeled Remote.
Then select the option:
“Allow connections from computers running any version of Remote Desktop (less secure)”
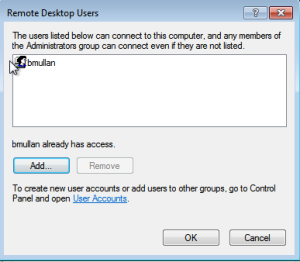
Click on the “Select Users” button and you will see this menu screen.
Next, click the Add button and in this menu enter your Windows 7 UserID.
Click Check Names.
Click OK to return to the previous menu and you should see your Windows UserID now listed as authorized for Remote Desktop.
Click OK to save this UseriD as a user allowed to use Remote Desktop.
Now we can start some of the interesting configuration for Windows.
Note: The reason why it must be a Windows 7 Ultimate or Enterprise version is that both of those are “capable” of supporting Microsoft’s RemoteApp as a “RemoteApp Server” but unfortunately Microsoft made the decision to not make that capability readily useable.
Ref: portions copied from..
2. Setup (Publish) Remote apps on 'server'
I used kim knight remote app tool.
- A person named Kim Knight built a GUI based application called RemoteAppTool that you can download from here:
- http://www.kimknight.net/remoteapptool
- Download and Install the RemoteAppTool into your Windows Virtual Machine (VM).
- Note: The RemoteAppTool requires .NET .
- After installation of the RemoteAppTool you need to start installing your Windows Applications that you will want available on your Ubuntu system.
- Create an entry for Windows Write in the remote app tool.
- Click the green plus sign and use the file browsing window to locate Write in c:\windows folder.
- I read that it may be necessary to use %windir% rather than c:\windows in the path and vpath.
- Save it.
- Press create client connection ( Its in the bottom right corner)

These next instructions are older and may not be correct or needed (Use the screenshots above).
- Right-Click on the Windows Icon for Kim Knight’s RemoteAppTool program and select to start it as an Administrator.
- Note: this is why you need to be an Admin or able to log-in as an Admin on the Windows VM
- After the RemoteAppTool starts you will see its GUI Menu.
- Click on the “New” button
- Enter any meaningful name for your RemoteApp
- At the next screen (RemoteApp Properties Entry screen) click on the 3 dots (…) to the right of the PATH entry which will bring up Windows Explorer. Use Explorer to search your system for ANY application you want to associate with this RemoteApp “name”.
- After you double-click on the .exe name of the Windows program you want to make a RemoteApp… all the rest of the fields in the RemoteAppTool menu should be filled in automatically.
- When the form is complete REMEMBER to Click SAVE !
- NOTE: Once you click SAVE your application is available from the Windows 7 VM as a Windows RemoteApp !
Registry change may be necessary ..
See:
It contains..
Windows Registry Editor Version 5.00
[HKEY_LOCAL_MACHINE\SOFTWARE\Policies\Microsoft\Windows NT\Terminal Services]"fAllowUnlistedRemotePrograms"=dword:00000001
3. Install Freerdp Prerequisites on Linux machine that will act as the 'client'
A: Linux Mint XFCE, based on Ubuntu 16.04:
- xfreerdp v1 is installed. It's good to go. Go to step 4.
B: This is on ubuntu 14.04 :
Get dependencies list...
albe@v206c:~$ sudo dpkg -I /home/albe/Downloads/freerdp-nightly_2.0.0+0~20170123165138.331~1.gbpd34291_amd64.deb
new debian package, version 2.0.
...
Package: freerdp-nightly
Version: 2.0.0+0~20170123165138.331~1.gbpd34291
Maintainer: FreeRDP
Depends: libasound2 (>= 1.0.16), libavcodec-ffmpeg56 (>= 7:2.4) | libavcodec-ffmpeg-extra56 (>= 7:2.4), libavutil-ffmpeg54 (>= 7:2.4), libc6 (>= 2.15), libcups2 (>= 1.4.0), libglib2.0-0 (>= 2.41.1), libgsm1 (>= 1.0.13), libgstreamer-plugins-base1.0-0 (>= 1.0.0), libgstreamer1.0-0 (>= 1.4.0), libjpeg8 (>= 8c), libpulse0 (>= 0.99.1), libssl1.0.0 (>= 1.0.0), libudev1 (>= 183), libusb-1.0-0 (>= 2:1.0.8), libx11-6 (>= 2:1.2.99.901), libxcursor1 (>> 1.1.2), libxdamage1 (>= 1:1.1), libxext6, libxfixes3, libxi6 (>= 2:1.2.99.4), libxinerama1, libxkbfile1, libxrender1, libxtst6, libxv1
... Install Dependencies:
- I haven't finished this yet.
4. Install Freerdp Nightly
- Visit Pre-builds in freerdp wiki..
- Visit.. https://ci.freerdp.com/job/freerdp-nightly-binaries/architecture=amd64,distribution=xenial,label=pkg-deb/
- Open deb with gdebi:
- https://ci.freerdp.com/job/freerdp-nightly-binaries/architecture=amd64,distribution=xenial,label=pkg-deb/lastSuccessfulBuild/artifact/freerdp-nightly_2.0.0+0%7E20170123165138.331%7E1.gbpd34291_amd64.deb
- install it.
5. Run it.
- example command..
- /opt/freerdp-nightly/bin/xfreerdp /u:dg /p:x /app:"||Windows Write" /v:192.168.88.60
- This starts up Windows Write in a window and you are finished.
You can publish cmd.exe and/or windows explorer and then access many programs with only one or two things published as remoteapp.
Other examples using wfreerdp on a windows client..
https://cloudbase.it/freerdp-for-windows-nightly-builds/
Other examples using wfreerdp on a windows client..
- wfreerdp /u:andyz /d:stackpole.ca /p:password /app:"||calc" /v:data2
- wfreerdp /d:stackpole.ca /w:1890 /h:990 /v:data2
https://cloudbase.it/freerdp-for-windows-nightly-builds/
see: https://github.com/FreeRDP/FreeRDP/wiki/CommandLineInterface
see: https://github.com/FreeRDP/FreeRDP/wiki/RemoteApp
see: https://github.com/FreeRDP/FreeRDP/wiki/RemoteApp
Subscribe to:
Posts (Atom)


